.jpg)
Monday, September 2, 2013
Bake Sale Cupcakes that Should Have Sold for More
The young men and young women in our ward were having a garage sale/bake sale/car wash the weekend after the wedding cake adventure happened. Since I had some leftover frosting on hand, as well as some raspberry jam, I whipped up some cupcakes and tweaked the frosting to make the following selections. Unfortunately, they were only selling the baked goods for $.50/each. My cupcakes were by far the most beautiful item there and could have easily sold for $1.00, thus helping the youth get more funds for summer camp. Maybe next year I'll suggest a price increase. . .
.jpg)
Three Tiers, or Three Tears
.jpg) July 24th is a holiday in Utah, and thus the perfect day for me to spend working on making a wedding cake for the next day. I was glad to have the full-day because this was going to be my first attempt at a three-tier cake! I was a bit nervous, but confident that it would turn out well.
July 24th is a holiday in Utah, and thus the perfect day for me to spend working on making a wedding cake for the next day. I was glad to have the full-day because this was going to be my first attempt at a three-tier cake! I was a bit nervous, but confident that it would turn out well.I regret that I didn't take more pictures of the step-by-step process that went into this cake, so you'll just have to make due with my comical descriptions!
Step One: Obsess over the fact that I moved to a new apartment with an oven that was new back in 1960. If one half of the cake was slightly darker than the other half, the bride didn't seem to notice.
Step Two: Get a last-minute email from the bride, deciding to change the base color of the cake from white to an undefined "teal/light green" color. Freak out and then go buy teal food color, luck out and magically match the color of the cake perfectly to the ribbons at the reception.
Step Three: Watch movies on the projector while you frost and stack the cake.

.jpg) Step Four: Freak out because you don't have a good way to pound a dowl through two layers of cardboard cake bases. Accept sensible suggestion of husband to hammer in the knife sharpener her pulled out of your knife rack. Give him a hug of joy as it works beautifully!
Step Four: Freak out because you don't have a good way to pound a dowl through two layers of cardboard cake bases. Accept sensible suggestion of husband to hammer in the knife sharpener her pulled out of your knife rack. Give him a hug of joy as it works beautifully!.jpg) Step Five: Stick stacked/undecorated cake in fridge while you take a break and go see The Great Gatsby at the dollar theater. Come back feeling depressed, but refreshed and ready to go back to work!
Step Five: Stick stacked/undecorated cake in fridge while you take a break and go see The Great Gatsby at the dollar theater. Come back feeling depressed, but refreshed and ready to go back to work!Step Six: Laboriously spend 2 1/2 hours piping Korean-style flowers and vines around the bottom two tiers of the cake. Bride has agreed to provide some kind of cake topper to make the top tier look less awkward.
.jpg) Step Seven: Naively believe bride about the cake topper.
Step Seven: Naively believe bride about the cake topper.Step Eight: Pick up your Korean cousin, as well as her extremely upset with the world friend, not only making you late to deliver the cake, but also providing you with a chorus of Korean anger while you drive.
Step Nine: Arrive at reception let, with most of the guests arrived. Hunt down the bride, only to learn that she has NOT brought a cake topper.
Step Ten: Firmly explain to the bride that the cake looks dumb without something on top and tell her you are going to put some piping on the top tier to make it match.
.jpg) Step Eleven: Kneel awkwardly in the middle of the reception room, piping crooked flowers and curly cues onto the cake. Thus destroying your two and half hours of hard work the night before making sure every line was perfectly straight. All the guests stare at you, little girls won't leave your side because they are too entranced.
Step Eleven: Kneel awkwardly in the middle of the reception room, piping crooked flowers and curly cues onto the cake. Thus destroying your two and half hours of hard work the night before making sure every line was perfectly straight. All the guests stare at you, little girls won't leave your side because they are too entranced.\
.jpg)
 Step Twelve: Take a few poor quality snapshots with your phone of your (almost) masterpiece while the bride and groom start greeting guests. Sigh with sadness that this will be the best picture that you get, since they had no photographer for the reception. The only other picture posted to Facebook was a blurry, yellowed version of your work of art that whites out half of it.
Step Thirteen: Return to your day job, just in time to not go over your lunch break. Vow to get someone else to deliver your cakes next time!
Star Trek with a Twist
.jpg) July Birthday #3 was for my 17-year-old brother-in-law (again with the hyphens!). He is a Star Trek fan, although not as intense as my husband (you know it's true, Derek!). I had the idea to do a tie-dye style cake, so I thought I could easily incorporate the Star Trek logo into it. The result wasn't quite what I had imagined, but still rather cool.
July Birthday #3 was for my 17-year-old brother-in-law (again with the hyphens!). He is a Star Trek fan, although not as intense as my husband (you know it's true, Derek!). I had the idea to do a tie-dye style cake, so I thought I could easily incorporate the Star Trek logo into it. The result wasn't quite what I had imagined, but still rather cool.Cake: Funfetti filled with cooked, flour-based vanilla custard.
Frosting/Decoration: Plain vanilla frosting mixed with the three famous Star Trek colors: blue, red and gold. I wish I would have made the yellow look a bit darker and mixed with some orange. As is, it looked a bit like a Captain America cake. But the Star Trek logo surely put away any doubts to that effect. The tie-dye effect was done by layering the colors around a central design and expanding outward, repeating until the whole cake was full. I learned this method when I was in third-grade art class. I used paintbrushes to make the logo smooth and more precise. This was my first paintbrush attempt on a cake and I was very pleased!
Basketball "Cake"
July is also a busy time because there are not one, not two, but THREE birthdays in my husband's family. Here is birthday #2, the "cake" I made for my ten-year-old brother-in-law(look at all those hyphens!).
.jpg)
.jpg) "Cake": The original request for his birthday cake was to have strawberry shortcake. I worked it out with his mom, or so we thought, to have her get a strawberry shortcake ready and I would make a "rice crispy" cake. Basketball is is favorite sport, so a giant basketball of Rice Krispy Treats is what he got! I created a double batch of the krispies and formed it into a ball, which I then refridgerated to help it get firm. (Unfortunately I made it with real butter. "What? But real butter is the best," you say! Yes, it is the best if you want to make a flat pan of treats. Margarine is what I should have used. Margarine makes the treats harden much more firmly. I learned that little lesson multiple times over the years. I wish I would have remembered it when making this basketball. By the time we got around to eating it, it looked like a half-deflated basketball instead of a perky round one!)
"Cake": The original request for his birthday cake was to have strawberry shortcake. I worked it out with his mom, or so we thought, to have her get a strawberry shortcake ready and I would make a "rice crispy" cake. Basketball is is favorite sport, so a giant basketball of Rice Krispy Treats is what he got! I created a double batch of the krispies and formed it into a ball, which I then refridgerated to help it get firm. (Unfortunately I made it with real butter. "What? But real butter is the best," you say! Yes, it is the best if you want to make a flat pan of treats. Margarine is what I should have used. Margarine makes the treats harden much more firmly. I learned that little lesson multiple times over the years. I wish I would have remembered it when making this basketball. By the time we got around to eating it, it looked like a half-deflated basketball instead of a perky round one!)
Frosting: I covered the rice crispy ball with a thin layer of buttercream. Then I mixed up some marshmallow fondant and dyed it using brown and orange coloring until the shade was what I wanted. It took some work to roll the fondant out nicely, but I was quite pleased with the result. It was only my second attempt at a fondant cake and I was rather pleased with the result.
Decoration: This was the most challenging part of the whole thing. After a lot of research online, I had a few different options for how I could make the pattern of a basketball on the fondant. First, I bought a sheet of basketball texturized scrapbook paper from Hobby Lobby. I laid this on top of the fondant and used a rolling pin to impress the pattern. The pattern looked alright once imprinted, but it sure made it impossible for me to pull the fondant up off the table because I had to roll hard to get the pattern to stick. Thus, first attempt failed. Attempt number two was to use one of those small, hand-held cheese graters and roll it over the top of the already placed fondant. This method worked like a charm and was a super fast way to imprint the texture onto the basketball. I finished it off by cutting lines of sugar paper to go around the ball and piping the words onto it. It was near midnight by the time I got to this point and my artistic skills were failing. I made the mistake of not measuring out the letters and centering them before piping them on. Although I will say I was pleased with the little NBA logo, as well as the awesome Jimmer Fredette autograph I put on the bottom (a brilliant idea by my sister-in-law!).
The final result was delicious. I may have liked it even more than anyone else who tried some. . . so I at least one person appreciated the minimum of six hours of work I put into it!
BONUS STORY:
Now here is the unfortunate part, apparently there was miscommunication, and my mother-in-law hadn't gotten the message that my cake wasn't a "cake" but a "treat". Thus, when we arrived, there was no strawberry shortcake to fulfill the birthday boy's request. My mother-in-law and I just looked at each other and said, "oh well, this'll do!" The candle stuck into the fondant well enough, and everyone seemed content with one dessert. And while the birthday boy seemed pleased with the basketball, his quiet request of his mom later that evening made us both roll our eyes, "Mom, can I still have some strawberry shortcake?"
A Consultation
 July 13 is an important day in my husband's family. It is the birthday of my brother-in-law Jason, who passed away over four years ago now. You can read a beautiful memorial about it by my husband here: Make Music of our Tears. To celebrate his birthday, we always go to the temple of The Church of Jesus Christ of Latter-day Saints, and then stop at his grave afterwards. I decided to make cupcakes to celebrate. These are pictures of a few of them that I kept aside. I was scheduled to do a consultation for a wedding cake later in the week, so I wanted to have something for her to try (foreshadowing for a future post about my first three-tier wedding cake!)
.jpg)
I made two kinds of cupcakes. There were chocolate cupcakes filled with regular frosting and covered in regular frosting. The pink cupcakes were white cake filled with raspberry and almond flavored frosting. I was personally partial to the white/raspberry combo. We all enjoyed gulping them down while an uncharacteristically strong wind buffeted us at the cemetery.
Binary Cake
My husband's grandmother commissioned me to make a birthday cake for one of my husband's cousins. We eat dinner with them on Sundays, so of course I would get to enjoy the cake as well!
 Cake: After getting the down-low from his wife, I made this into a German Chocolate cake. I used a regular german chocolate cake mix and modified it with the WASC recipe.
Filling: I made a classic coconut-pecan german chocolate cake filling. It was thick and gooey and delicious. The whole cake was marked a delicious success.
.jpg) Frosting/Decoration: This is just a basic vanilla frosting. But the decoration is where it really became unique. My husband's cousin is a computer programmer. I found a website that translated Happy Birthday into binary, which I then painstakingly copied onto the top of the cake. My hand was tired afterward, meaning I should have thinned out the chocolate frosting before I wrote with it, oh well! The cousins were thoroughly thrilled with getting to sit and figure out the words on the cake. They sat and analyzed it for at least ten minutes, discussing the virtues of binary.
Frosting/Decoration: This is just a basic vanilla frosting. But the decoration is where it really became unique. My husband's cousin is a computer programmer. I found a website that translated Happy Birthday into binary, which I then painstakingly copied onto the top of the cake. My hand was tired afterward, meaning I should have thinned out the chocolate frosting before I wrote with it, oh well! The cousins were thoroughly thrilled with getting to sit and figure out the words on the cake. They sat and analyzed it for at least ten minutes, discussing the virtues of binary.

Filling: I made a classic coconut-pecan german chocolate cake filling. It was thick and gooey and delicious. The whole cake was marked a delicious success.
.jpg) Frosting/Decoration: This is just a basic vanilla frosting. But the decoration is where it really became unique. My husband's cousin is a computer programmer. I found a website that translated Happy Birthday into binary, which I then painstakingly copied onto the top of the cake. My hand was tired afterward, meaning I should have thinned out the chocolate frosting before I wrote with it, oh well! The cousins were thoroughly thrilled with getting to sit and figure out the words on the cake. They sat and analyzed it for at least ten minutes, discussing the virtues of binary.
Frosting/Decoration: This is just a basic vanilla frosting. But the decoration is where it really became unique. My husband's cousin is a computer programmer. I found a website that translated Happy Birthday into binary, which I then painstakingly copied onto the top of the cake. My hand was tired afterward, meaning I should have thinned out the chocolate frosting before I wrote with it, oh well! The cousins were thoroughly thrilled with getting to sit and figure out the words on the cake. They sat and analyzed it for at least ten minutes, discussing the virtues of binary.Carrot Cake with Cream Cheese
My mom's favorite cake was carrot cake, so I happily obliged.
.jpg)
 Cake: As mentioned, this was a carrot cake. I went all out and included nuts, raisins, coconut, and pineapple to a carrot cake mix made as a WASC base. Pineapple juice was the liquid. The cake was wonderfully dense and moist, just as a carrot cake should be!
Filling and Frosting: Using the same Sam's Club bakery frosting that I used in the previous cake, I mixed in a few 8 oz. packets of cream cheese. It mixed in nicely and really added a nice cheesy taste to the frosting. I used it to both fill and frost the cake. My extra large tips came in handy again. I even went to the effort to pipe little carrots onto the cake, just like a bakery. While the tres leches cake was delicious, my heart was with the carrot cake's dense layers and mouth-watering frosting.
These pictures were taken after the three hour drive from home to Capitol Reef. They survived the journel well, with a bag of ice sitting nearby to keep the cream cheese frosting cool.
.jpg)

Filling and Frosting: Using the same Sam's Club bakery frosting that I used in the previous cake, I mixed in a few 8 oz. packets of cream cheese. It mixed in nicely and really added a nice cheesy taste to the frosting. I used it to both fill and frost the cake. My extra large tips came in handy again. I even went to the effort to pipe little carrots onto the cake, just like a bakery. While the tres leches cake was delicious, my heart was with the carrot cake's dense layers and mouth-watering frosting.
These pictures were taken after the three hour drive from home to Capitol Reef. They survived the journel well, with a bag of ice sitting nearby to keep the cream cheese frosting cool.
The Tres Leches Experiment
In May 2013 my family was having a reunion down in Capitol Reef National Park. Since I only see my family about twice a year, I decided to take advantage and make birthday cakes for both my mom and brother, who both have June birthdays. Here is the first cake, made for my brother:
.jpg)

Cake: My brother said his favorite cake was tres leches. Since real tres leches is super moist and is impossible to stack, I had to improvise with my favorite WASC cake recipe. I used vanilla flavoring with a white cake mix, with the addition of some evaporated milk and half and half.
Filling: Having a dulce de leche filling only seemed natural for a tres leches cake. I made my dulce de leche by boiling a can of sweetened condensed milk for about 2 1/2 hours. It turned out a beautiful carmel color and tasted great, too! I filled the cake with it, then used the rest to drizzle over the top. The effect was rather lovely and delicious looking.
Frosting: Plane white frosting from Sam's club. I got extra large tips as a gift from my husband for mother's day (despite not being a mother yet!). They came in handy and made the cake look like it came from a real bakery.
Saturday, August 31, 2013
Mother's Day Minis
Mother's day 2013 saw the last minute prep of mini white cakes with frosting and flowers. Below is a picture of the one I made for my husband's grandmother(known to them as "Gramma"). There was a matching one for his mom as well. This was a simple affair, but a fun little gift!
.jpg)
.jpg)
Saturday, August 17, 2013
Rise and Shout
The end of April brought about the graduation of my husband from Brigham Young University. Since he is a die-hard Cougar fan, I had to make him a themed cake to that effect. Here is a shot of the outside.
.jpg)
.jpg)
.jpg)
As far as exterior decoration, it was pretty standard buttercream. I tinted the frosting the wrong shade though and made it more teal than Cougar blue, oops! I was busy making a Cafe Rio style dinner at the same time as making this cake and the evening was late by the time I finished.
.jpg)
But the inside of the cake was rather exciting. I attempted to bake Blue "Y"s into the cake. This piece wasn't the best, but you can see on the bottom layer how it showed up. There were some pieces that looked better than others. I baked a 9x13 cake colored BYU blue. After it was cooled and then frozen, I used a cookie cutter I had made out of a can of soda to cut out the Y shapes. Then I placed them in a circle around the bottom of the round cake pans and poured the yellow batter over them. The cutouts were a bit too tall for the cake, so the tops of them were a tad above the level of the cake. Luckily the frosting hid all that! They also moved around a bit as the cake baked, making them tilt to the side, or become misshapen. Another method I read online that could work would be to make sugar cookies in your color and shape of choice and just barely bake them until firm. Then circle them in your cake pan. This method would have probably made for a better looking end result so I'll have to try it next time!
"What am I thinking? I can't eat this whole thing by myself!"
April brought with it the birthday of my coworker Coryn. Coryn has a deep, deep love for all things Pandas. Thus, the choice for her birthday cake was clear. I went online and looked at different drawings of pandas and found a design I thought I could do well. I opted for a more cartoonistic look over a realistic one since my skills are just not that good.

Method:
Cake: To match the panda colors, I chose to make this a cookies and cream cake. The method for this was to simply crush up a bunch of cookies and mix them into a white cake mix. I baked a 9x13 pan and two 8" rounds to make the cake. The head was made of the two rounds, and the body was made with half the 9x13 stacked on itself. I had to use paper cut down to scale to play with the pieces until I could make it fit and look right. It helped that the look of the panda was cartoonish so I had some leeway.
Frosting: This was my first attempt at making a cooked frosting. I started by making a Roux base and then adding in regular grain sugar, etc. It tasted good and was the perfect level of sweetness. It did have a hint of flour in the flavor, which I didn't care for as much, but it sure beat the greasy coating of homemade buttercream made with all shortening. The layers of the cake were filled with frosting and the sprinkled with more cookie crumbles. The black frosting was store bought since it's not easy to recreate that color at home.
Other Decorations: I made the eyes with large marshmallows cut in half, and upside down chocolate chips for the pupil. It turned out pretty darn cute, if I do say so myself.
I put the cake on Coryn's desk the next morning at work. It took her a good half hour of having it take up half her desk space to decide that she probably should share it and not keep it for herself. Here is what she said, "What am I thinking? I can't eat this whole thing by myself."The rest of the office was grateful that she came to her senses:-D
February Birthday for Grandma
February finally rolled around and there was yet another birthday to celebrate. This time it was my husband's grandma who was turning 78 so Derek's cousin, HyeWon, suggested that we surprise her with a cake. We decided to experiment with a new kind of frosting by mixing in whipped cream with regular buttercream. The frosting tasted great, but it certainly melted faster than typical buttercream. I will have to search out a better whipped cream frosting for next time.


My favorite part of making this cake was getting to do it with HyeWon. I taught her how to make roses and she picked it up quickly and did a great job.

It was also HyeWon's idea to add the cute vines around the roses as well. They added just the right touch.
Thursday, August 15, 2013
January Cake #2
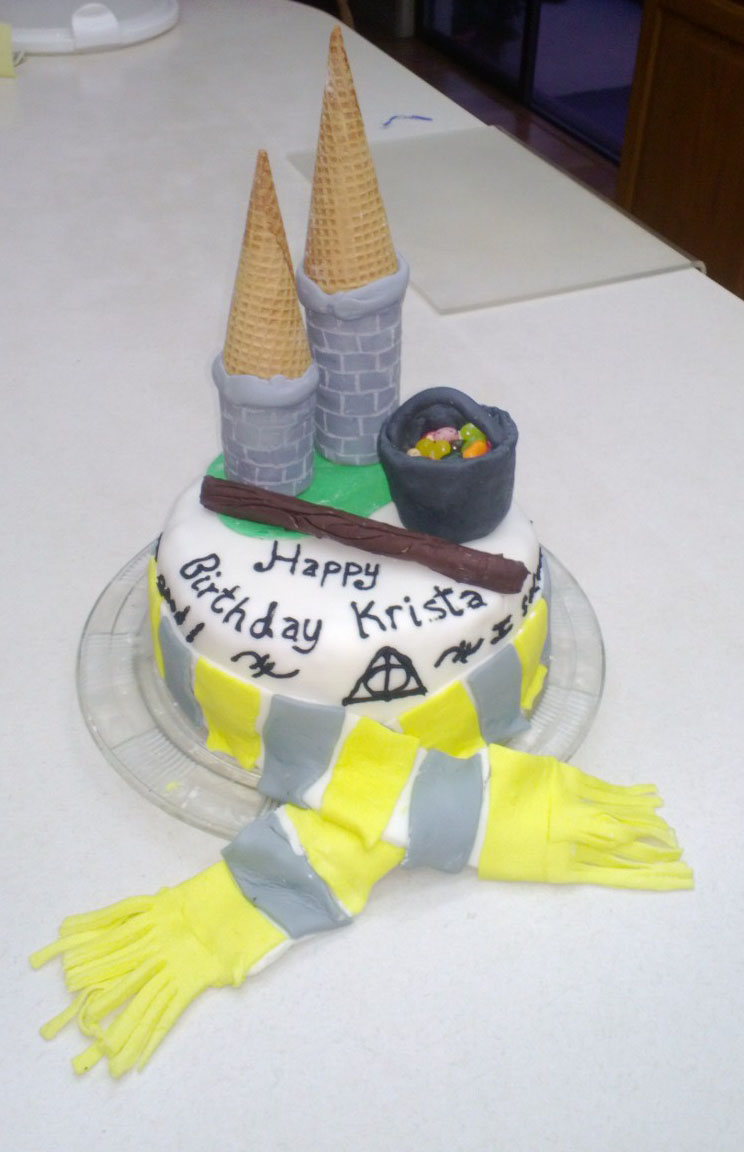
My second cake in January closely followed after the first. This Harry-Potter themed cake was my first attempt and making and using fondant.
I used the classic marshmallow fondant recipe. My base covering of the cake had a few rough spots, but it seemed to go on fairly well. Unfortunately I didn't take any pictures of the process. Everything on the cake is covered in fondant except the wand.
The towers were made of toilet paper rolls covered in fondant. The roofs were of course ice cream cones.
The cauldron was made by wrapping fondant around a cut-off piece of plastic cup and filled with Jelly Bellies. I would have put Bertie Botts Every Flavor Beans in them but I couldn't find them at any of the stores at that time of year.
The wand is a chocolate covered pretzel with wood lines drawn into it.
The words around the sides of the cake say "I solemnly swear that I am up to no good. . . "
Things I would do differently: 1)On the scarf, I would have put the colored pieces of fondant on the scarf after I wrapped it around the cake. The scarf stretched when I moved it to the cake and the pieces separated so they didn't have one smooth look. 2) I would make my fondant a bit more pliable than it was because it was difficult to shape and form due to stiffness. 3) I would get a bigger cake carrier since part of the scarf got squished in transit.
However, none of that mattered to Krista, who let out a big squeal when she walked in to see the cake. I think she liked it:-D
January Cake #1
January is an incredibly busy month for birthdays and such. Both my husband and I celebrate our birthdays in January, as well has my youngest sister-in-law who turned 12! So of course I had to make special cakes for them. Here are pictures the Lord of the Rings Eye of Sauron cake I made for my husband. I can't remember what flavor was inside, but it was probably something pretty normal like yellow cake with vanilla filling. It took a while to get the colors to mix just right to look like the eye. In the end I was pretty pleased with it. If I were to redo it, I would use paint brushes to run the colors instead of just a spatula like I did here. I will say that the Elvish written around the outside turned out fairly decent for a first go.


Monday, April 15, 2013
My First Wedding Cake - THIS IS MY WORK
It finally happened, my former roommate commissioned me to make her a two-tier wedding cake. She wanted lemon cake with raspberry filling. I found a new cake recipe (I discovered the WASC recipe and will never go back to regular cake!) as well as a better frosting recipe using Meringue powder(definitely an improvement on classic buttercream). Here are the professional pictures of my work, woohoo!


Isn't it lovely? The colors requested were gray and yellow and she specifically wanted twigs and flowers. I thought it turned out alright, but I wish I would have been better at piping the twigs and such. The base of the cake was my idea since I knew she was going to decorate with jars and twine. The topper was made to match the name plates at the tables. I thought it was all a nice touch.

The first cut!

Me and the bride with my creation! This also gives you a better sense of the actual size of the cake.

The guests enjoyed the cake quite a bit!
I learned a lot from making this cake. 1) Found better frosting recipe for wedding cakes 2)discovered the most delicious cake recipe, and 3)learned that if you use ribbon you MUST line it with wax paper or the grease from the frosting will soak through. A little double-stick tape and wax paper did the trick perfectly.
The Professional Wedding Cake - NOT MY WORK
Here is the wedding cake I ended up ordering. It was too much work to make my own wedding cake with everything else I had to do. It was a pretty cake, although not quite what I had ordered, and it tasted delicious:


I wish I could make buttercream that perfect, but I would probably need better tools for that! Notice the poor "celtic knots" that they tried to make.

Just for Fun: Some Dust Mites!
Just to change things up, here are the dust mite cake balls I made for a Totoro party I had with my coworkers. I purposely sabotaged them just a little to make them look especially silly:


Practice Wedding Cake #2
Knowing that my layering techniques definitely needed some work, I attempted cake number two. I wanted to practice my Celtic Knot making as well. Here was the result:


This cake still had a bit of a tilt to it, but it was better than the last try! The decorations mainly were centered on giving me a chance to practice celtic knots.

The top was a large eternity knot. It was a difficult thing to pipe so I was at a loss to know the best way to design it in the end. Too bad I never ended up having to do it.

It was a yummy lemon cake filled with raspberry jam.
I think my skills were definitely improving by this point in time.
Practice Wedding Cake #1
Well here it is, my first practice wedding cake! I was pretty pleased with my work on a first try, but I still needed more practice, that's for sure.


I choose to make my cake Red Velvet for practice since I'm pretty much obsessed with any kind of food with the word velvet in it. There were two fillings that I alternated between layers: cream cheese and chocolate cream cheese. The cake was wonderfully delicious, although I have since found a cake recipe that I find even tastier. I'll post the recipe later on.

I was having a lot of fun making my cake so I'm posting my joyous face for you to see!
And here is the final outcome! She sat crooked but I thought the decoration was fun. I was still dissatisfied with the taste of traditional buttercream, however!


I think I would have been satisfied to have this little cake at my wedding! I thought the decoration was charming, if I do say so myself. The chocolate cheesecake filling was also enchanting.
Wedding Cake Practice Begins
With my wedding soon approaching, I decided I wanted to try my hand at making my own wedding cake I was going to need to practice getting it right, especially the part where I would have to make tiers! I also wanted to practice cake flavors and decoration styles. We wanted to have a celtic theme running through the wedding a bit since my ring was designed with an eternity knot in it.


I designed this in Paint(very tech savvy, ha!) thinking I might want my wedding cake to look similar. Here's my rough design, and in the next two posts I'll show you my practice cakes! Let me warn you now though that I didn't end up making my cake and I was a little disappointed with the work of the bakery I hired. I gave them a simpler design than this but they completely butchered the celtic knot design.
Sunday, April 14, 2013
Practice Cake for Coworkers
After we got engaged, I really wanted to have a go at making my own wedding cake. I took as many opportunities as possible to practice making cakes. We have a monthly birthday party at work so I decided to make this little number in celebration. It was chocolate cake filled with peanut butter buttercream. The inside was tasty but I wasn't a fan of the straight buttercream. I was pleased with how the roses turned out.


My cake writing clearly needed some work. I find I do much better when I am copying the font exactly from something I'm looking at. Good thing there are infinite fonts available online for me to use as examples! I also feel like I was finally starting to get a good handle on making my frosting smooth. I think it was soon after this cake that I bought plastic spackling tools to help me make things as smooth as possible. Best three dollars I ever spent on a cake tool! I might even try metal ones in the future.

I thought the roses and mums turned out rather nicely. The picture makes the dark blue flowers look black, but they weren't nearly that sultry in real life!
Impressing the In-Laws
About a month before we got engaged, my mom and sister flew out to visit me. I took them to meet my boyfriend's family. Since my sister was in town I wanted to take advantage and make a cake with her! This is our creation:


This is my lovely sister modeling the cake in my tiny apartment kitchen I shared with three other roommates. The frosting is made with evaporated milk and less shortening and butter than the average buttercream. I liked the taste much better than buttercream. The clever use of strawberries around the edge of the cake and the fancily cut up strawberry in the middle were all Lynette's design. She has quite the creative flair!

Here's another bonus shot of us both. Sorry you can't see the cake too well in any of these. It was delicious though!
A Y-themed Birthday
Continuing on with catching up to present day cake making, here is the next cake I produced.


This is a birthday cake for my future husband. It is decorated with the BYU Y logo. Again, I think my proportions needed some work, but I thought I made a good go of it. I used a star tip to make the design. My designs hadn't gone beyond this and the Jamaican flag cake at this point in time.
Saturday, April 6, 2013
Birthday Cake for My Future Mother-in-Law
After just a few dates, my future husband wanted an excuse to go out with me again. I had told him I enjoyed making cakes and conveniently his mom's birthday was just a few weeks away. We set a date for him to come "help" me make the cake. And by that I mean he sat and watched me make it. The next day we went to his parent's house and I met the whole family. After that, I decided we could officially be a couple because I liked them so much. Here is the fated birthday cake!


I realized after this cake that my frosting writing needed some work!
**Side note on this cake: When I was little my mom would always hide a marble in birthday cakes and whoever found it in their piece got a surprise. I decided to do this for my future husband's family. I didn't have a marble so I used a marble charm from a necklace my dad got me in China. I was terrified they would break a tooth or something, but it turned out well and they loved it!
Birthday Cake Jamaican Style
It was months after the class ended that I had an excuse to make another cake. This time my roommate decided to throw a Jamaican-themed birthday party for her brother. Yes, it sounds random, but it was an awesome party! Here is the simple 9x13 cake I made for it of the Jamaican flag.

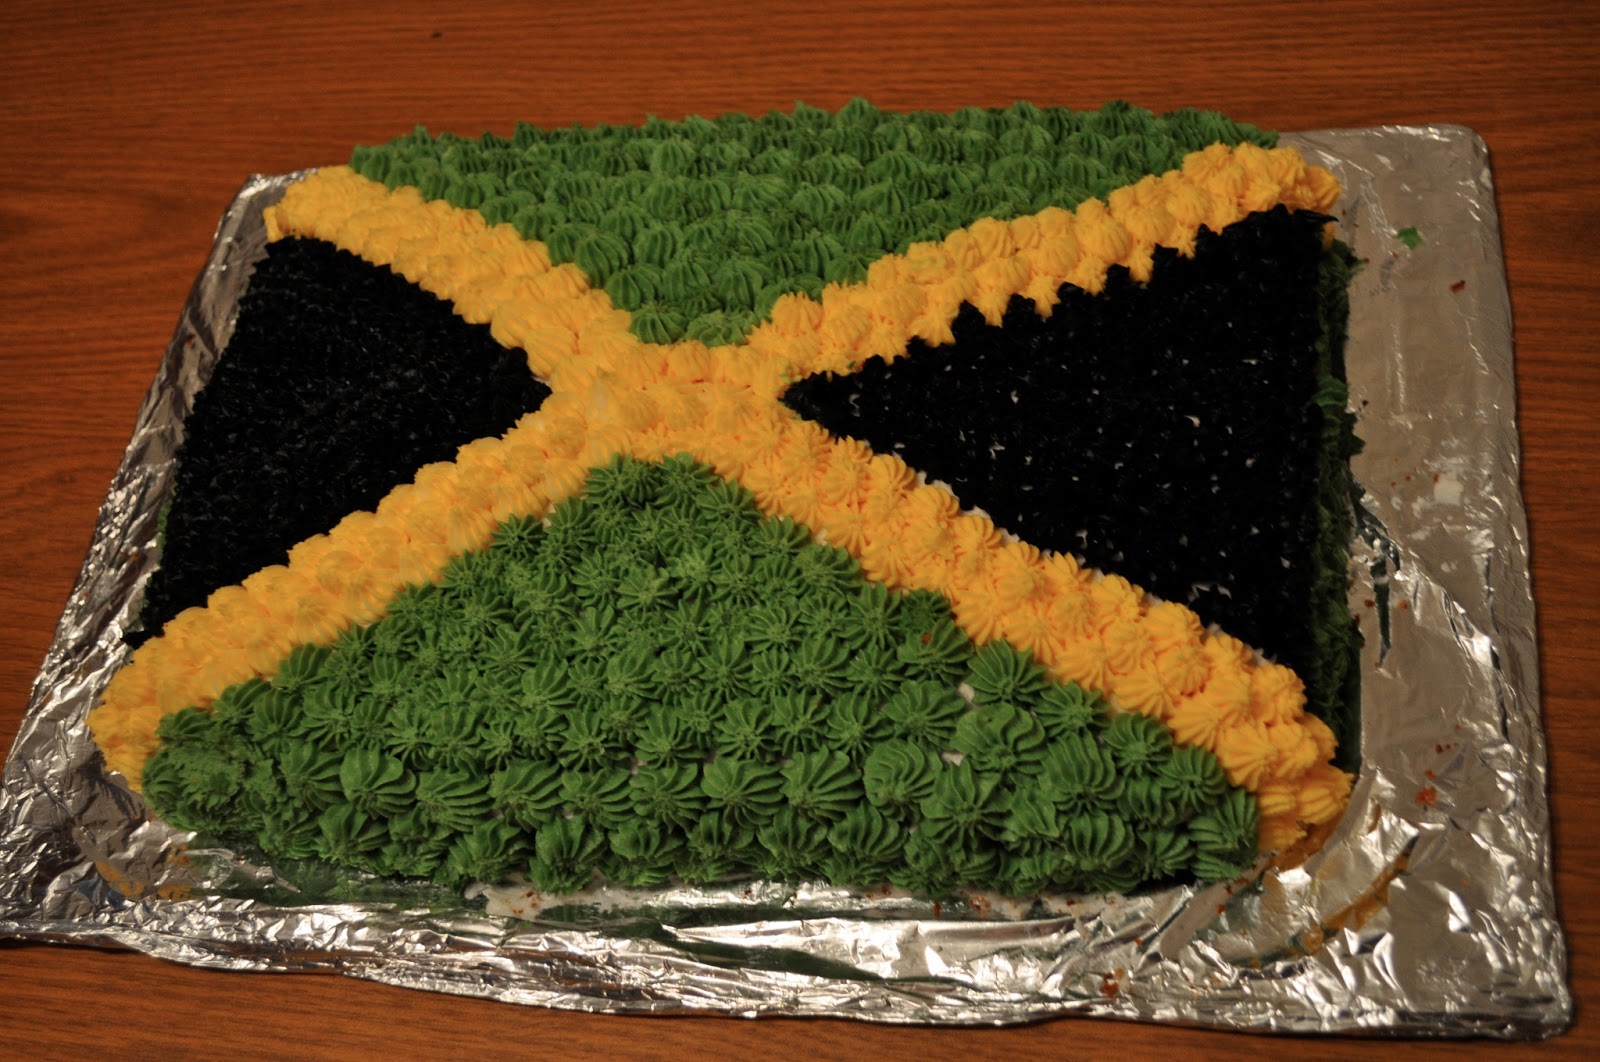
This was a fun one to make, but I think I definitely needed to work on my proportions.
Subscribe to:
Posts (Atom)